Switches and Crossings: Difference between revisions
Created page with '{{EnglishNav}} {{EnglishConstruction}} Überall, wo zwei Gleise aufeinander treffen, befinden sich '''Weichen''' oder '''Kreuzungen'''. Der folgende Artikel erläutert, wie die…' |
Completed translation into English |
||
| (20 intermediate revisions by the same user not shown) | |||
| Line 1: | Line 1: | ||
{{EnglishNav}} | {{EnglishNav}} | ||
Switches or crossings can be found at the places where two tracks meet. The following article explains how they are displayed on the panel, the function of the various indicators and what to consider when operating them. | |||
==Switches== | ==Switches== | ||
| Line 10: | Line 8: | ||
[[File:Weiche_Melder.PNG|200px|thumb|right]] | [[File:Weiche_Melder.PNG|200px|thumb|right]] | ||
Simple switches are represented as branches in the track diagram. In the middle of the switch is the Switch Button or so-called ''Weichentaste'' (WT) [E]. Next to the track are two indicator lights, and in the track three indicator lights. | |||
===Indicators=== | ===Indicators=== | ||
A simple switch has the following indicators | |||
Eine einfache Weiche hat folgende Melder: | Eine einfache Weiche hat folgende Melder: | ||
* 2 | * 2 ''Position- and Monitoring'' indicators (StÜM) [A] | ||
* 1 | * 1 ''Narrow end'' indicator [B] | ||
* 1 | * 1 ''Locked'' indicator [C] | ||
* 1 | * 1 ''Manually Locked'' indicator [D] | ||
In the default state of the switch indicator lights are off. The position of the switch is not visible then. The WT button must be pressed to show the position of the switch. The StÜM of the actual switch position will be shown for a few seconds. To show all switch positions continiously, press the EIN button on the [[Switch Indicators|Stelltisch group button]] tile. [[Set Route From Middle Switch|Middle switches]] are the only exception: For these type of switches the corresponding StÜM will be lit continiously, independent of the setting of the 'Stelltisch' group button. | |||
====Positioners and monitoring indicators (StÜM) [A]==== | ====Positioners and monitoring indicators (StÜM) [A]==== | ||
The two StÜMs simultaneously serve as: | |||
* | * Monitor indicator – The indicator will be blinking yellow, when the switch is moving towards that position. | ||
* | * Position indicator – A steady yellow light shows the switch position, but only in case: | ||
** | **the WT has been pressed; | ||
** | **the switch is manually locked; | ||
** | **a [[Routes|route]] has been set over the switch; | ||
** | **the switch acts a flank protection of a route, or | ||
** | **the [[Switch Indicators]] (Stelltisch) is set to On (Ein). | ||
* | *Occupied Indication - Steady red light showing switch is occupied | ||
* | *Trailed Switch inidicator - Both StÜMs are blinking (yellow or red), meaning the switch has been [[Trailed Switch Reset Button|trailed]] due to a trailing-point movement. An alarm buzzer will sound as well. | ||
==== | ====Narrow End indicator [B]==== | ||
The ''Narrow End indicator'' lights ''yellow'', when a route has been set over the switch. It lights ''red'', when the switch is occupied by a train. | |||
==== | ====Locked Indicator [C]==== | ||
The ''Locked'' indicators indicates that the switch is locked in a route. As long as the indicator is lit, the switch's position can not be changed. If the switch itself is part of the route, the ''Locked'' indicator, ''Narrow end'' and the corresponding StüM will light yellow (or red if the switch is occupied). If the switch only provides flank protection for the route, then only the ''Locked'' indicators and the corresponding StÜM light up yellow. | |||
==== | ====Manually Locked Indicator [D]==== | ||
When the switch is manually locked with the [[Lock Switch Button]], the manually locked indicator is lit red. The current switch position will be shown as well. | |||
===The Switch Button=== | ===The Switch Button=== | ||
The switch can be operated with the switch button (WT) [E]. Pressed alone, it displays the current position of the switch by the momentary illumination of the corresponding StÜM (position indicator [A]). When pressed together with one of the various Switch Group buttons it is used to | |||
* | *[[Throw Switch Button|Throw the switch]] manually; | ||
* | *To [[Lock Switch Button|manually lock]] the switch; | ||
* | *To [[Unlock Switch Button|unlock]] a manully locked switch; | ||
* | *To reset a [[Trailed Switch Reset Button|trailed switch]]; | ||
* | *To revoke the locking of a switch when it is part of a route. The group button to be used depends on if the route state is a [[Revoke Train Route Button| train route (FHT)]] or a [[Revoke Train Route Button| shuntroute (FRT)]]; | ||
*To reset an [[Axle Counter Reset Button|axle counter circuit]] of the switch (if availble; the WT button is in this case braun with a white dot). | |||
===Examples=== | ===Examples=== | ||
<gallery widths=120px heights=80px perrow=5> | <gallery widths=120px heights=80px perrow=5> | ||
File:Weiche_FS.PNG| | File:Weiche_FS.PNG|Switch locked in route | ||
File:Weiche_FS_bes.PNG| | File:Weiche_FS_bes.PNG|Switch locked in route and occupied | ||
File:Weiche_Flank.PNG| | File:Weiche_Flank.PNG|Switch locked as flank protection | ||
File:Weiche_gesp.PNG| | File:Weiche_gesp.PNG|Switch manually locked | ||
File:Weiche_AZ.png| | File:Weiche_AZ.png|Switch with axle-counting circuits | ||
</gallery> | </gallery> | ||
==Crossings== | ==Crossings== | ||
At crossings, two tracks cross each other, without the possiblity to change track. Simple crossings do not have moving parts. More complex crossing do have moveable frog points, to ensure that the train's wheels are guided correctly over the crossing. For interlocking point of view, the corssing must be suecured, as there are two possible routes over the crossing. The crossing is therefore operated like a switch and also has a Switch button, four StÜMs, a ''Locked'' indicator and a ''Manually locked'' indicator. | |||
<gallery widths=120px heights=80px> | <gallery widths=120px heights=80px> | ||
File:Crossing.png|Crossing | File:Crossing.png|Crossing | ||
</gallery> | </gallery> | ||
== | |||
==Slip Switches== | |||
Slip Switches are a mixed form of a crossing and switches: They allow trains crossing a track or to change track. On the panel they are presented as crossing with one (single slip switch) or two (double slip switch) additional lines. These lines indicate which track change at the crossover are possible (in the example of the Single slip switch): from top left to bottom right and top right and vice versa, but not from bottom left to bottom right). We distinguish the a/b-branch and the c/d branch. | |||
<gallery widths=140px heights=90px> | <gallery widths=140px heights=90px> | ||
| Line 78: | Line 79: | ||
</gallery> | </gallery> | ||
In principle, the two branches are just two simple switches. Both switches can be operated indepently from each other (i.e. throwing switch, locking switch etc.), and therefor each branch has its own indicators. However, there is only one Switch button (WT). Before each operation, one must ensure that the correct branch is selected (with the [[Switch Selection|Switch Selection button]]) for operation. | |||
==Derailer== | ==Derailer== | ||
Derailers are mainly found where the main tracks connect to secondary tracks (for example: shunting areas or sidings). They serve as a flank protection, in case there is no 'normal' switch present that can provide the required flank protection and to derail a train which is accidentally driving into it. Derailers are normally in their diverted position. When a route has been set over it, they need to be set back to their groun position manually afterwards. They have a switch button, a ''Locked'' indicator and a ''Manually locked'' indicator. | |||
<gallery widths=100px heights=80px> | <gallery widths=100px heights=80px> | ||
Latest revision as of 13:18, 26 October 2011
Contents | FAQ | Manual | General Tips and Tricks | Change Log | Multiplayer Manual | Line Operations Manual | Voice Communications | Change Log | Developers pages
Switches or crossings can be found at the places where two tracks meet. The following article explains how they are displayed on the panel, the function of the various indicators and what to consider when operating them.
Switches
Representation

Simple switches are represented as branches in the track diagram. In the middle of the switch is the Switch Button or so-called Weichentaste (WT) [E]. Next to the track are two indicator lights, and in the track three indicator lights.
Indicators
A simple switch has the following indicators Eine einfache Weiche hat folgende Melder:
- 2 Position- and Monitoring indicators (StÜM) [A]
- 1 Narrow end indicator [B]
- 1 Locked indicator [C]
- 1 Manually Locked indicator [D]
In the default state of the switch indicator lights are off. The position of the switch is not visible then. The WT button must be pressed to show the position of the switch. The StÜM of the actual switch position will be shown for a few seconds. To show all switch positions continiously, press the EIN button on the Stelltisch group button tile. Middle switches are the only exception: For these type of switches the corresponding StÜM will be lit continiously, independent of the setting of the 'Stelltisch' group button.
Positioners and monitoring indicators (StÜM) [A]
The two StÜMs simultaneously serve as:
- Monitor indicator – The indicator will be blinking yellow, when the switch is moving towards that position.
- Position indicator – A steady yellow light shows the switch position, but only in case:
- the WT has been pressed;
- the switch is manually locked;
- a route has been set over the switch;
- the switch acts a flank protection of a route, or
- the Switch Indicators (Stelltisch) is set to On (Ein).
- Occupied Indication - Steady red light showing switch is occupied
- Trailed Switch inidicator - Both StÜMs are blinking (yellow or red), meaning the switch has been trailed due to a trailing-point movement. An alarm buzzer will sound as well.
Narrow End indicator [B]
The Narrow End indicator lights yellow, when a route has been set over the switch. It lights red, when the switch is occupied by a train.
Locked Indicator [C]
The Locked indicators indicates that the switch is locked in a route. As long as the indicator is lit, the switch's position can not be changed. If the switch itself is part of the route, the Locked indicator, Narrow end and the corresponding StüM will light yellow (or red if the switch is occupied). If the switch only provides flank protection for the route, then only the Locked indicators and the corresponding StÜM light up yellow.
Manually Locked Indicator [D]
When the switch is manually locked with the Lock Switch Button, the manually locked indicator is lit red. The current switch position will be shown as well.
The Switch Button
The switch can be operated with the switch button (WT) [E]. Pressed alone, it displays the current position of the switch by the momentary illumination of the corresponding StÜM (position indicator [A]). When pressed together with one of the various Switch Group buttons it is used to
- Throw the switch manually;
- To manually lock the switch;
- To unlock a manully locked switch;
- To reset a trailed switch;
- To revoke the locking of a switch when it is part of a route. The group button to be used depends on if the route state is a train route (FHT) or a shuntroute (FRT);
- To reset an axle counter circuit of the switch (if availble; the WT button is in this case braun with a white dot).
Examples
-
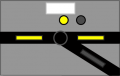 Switch locked in route
 -
 Switch locked in route and occupied
 -
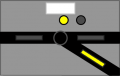 Switch locked as flank protection
 -
 Switch manually locked
 -
 Switch with axle-counting circuits


Crossings
At crossings, two tracks cross each other, without the possiblity to change track. Simple crossings do not have moving parts. More complex crossing do have moveable frog points, to ensure that the train's wheels are guided correctly over the crossing. For interlocking point of view, the corssing must be suecured, as there are two possible routes over the crossing. The crossing is therefore operated like a switch and also has a Switch button, four StÜMs, a Locked indicator and a Manually locked indicator.
-
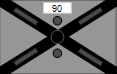 Crossing

Slip Switches
Slip Switches are a mixed form of a crossing and switches: They allow trains crossing a track or to change track. On the panel they are presented as crossing with one (single slip switch) or two (double slip switch) additional lines. These lines indicate which track change at the crossover are possible (in the example of the Single slip switch): from top left to bottom right and top right and vice versa, but not from bottom left to bottom right). We distinguish the a/b-branch and the c/d branch.
-
 Single Slip Switch
 -
 Double Slip Switch
 -
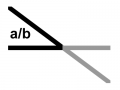 a/b-branch
 -
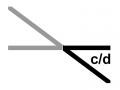 c/d-branch


In principle, the two branches are just two simple switches. Both switches can be operated indepently from each other (i.e. throwing switch, locking switch etc.), and therefor each branch has its own indicators. However, there is only one Switch button (WT). Before each operation, one must ensure that the correct branch is selected (with the Switch Selection button) for operation.
Derailer
Derailers are mainly found where the main tracks connect to secondary tracks (for example: shunting areas or sidings). They serve as a flank protection, in case there is no 'normal' switch present that can provide the required flank protection and to derail a train which is accidentally driving into it. Derailers are normally in their diverted position. When a route has been set over it, they need to be set back to their groun position manually afterwards. They have a switch button, a Locked indicator and a Manually locked indicator.
-
 Derailer
