Switches and Crossings
Contents | FAQ | Manual | General Tips and Tricks | Change Log | Multiplayer Manual | Line Operations Manual | Voice Communications | Change Log | Developers pages
Page is under construction. Information is subject to change.
Überall, wo zwei Gleise aufeinander treffen, befinden sich Weichen oder Kreuzungen. Der folgende Artikel erläutert, wie diese auf dem Stelltisch dargestellt werden, welche Funktion die verschiedenen Leuchtmelder haben und was bei der Bedienung zu beachten ist.
Switches
Representation

Simple switches are represented as branches in the track diagram. In the middle of the switch is the Switch Button or so-called Weichentaste (WT) [E]. Next to the track are two indicator lights, and in the track three indicator lights.
Indicators
A simple switch has the following indicators Eine einfache Weiche hat folgende Melder:
- 2 Position- and Monitoring indicators (StÜM) [A]
- 1 Narrow end indicator [B]
- 1 Locked indicator [C]
- 1 Manually Locked indicator [D]
In the default state of the switch indicator lights are off. The position of the switch is not visible then. The WT button must be pressed to show the position of the switch. The StÜM of the actual switch position will be shown for a few seconds. To show all switch positions continiously, press the EIN button on the Stelltisch group button tile. Middle switches are the only exception: For these type of switches the corresponding StÜM will be lit continiously, independent of the setting of the 'Stelltisch' group button.
Positioners and monitoring indicators (StÜM) [A]
The two StÜMs simultaneously serve as:
- Monitor indicator – The indicator will be blinking yellow, when the switch is moving towards that position.
- Position indicator – A steady yellow light shows the switch position, but only in case:
- the WT has been pressed;
- the switch is manually locked;
- a route has been set over the switch;
- the switch acts a flank protection of a route, or
- the Switch Indicators (Stelltisch) is set to On (Ein).
- Occupied Indication - Steady red light showing switch is occupied
- Trailed Switch inidicator - Both StÜMs are blinking (yellow or red), meaning the switch has been trailed due to a trailing-point movement. An alarm buzzer will sound as well.
Narrow End indicator [B]
The Narrow End indicator lights yellow, when a route has been set over the switch. It lights red, when the switch is occupied by a train.
Locked Indicator [C]
The Locked indicators indicates that the switch is locked in a route. As long as the indicator is lit, the switch's position can not be changed. If the switch itself is part of the route, the Locked indicator, Narrow end and the corresponding StüM will light yellow (or red if the switch is occupied). If the switch only provides flank protection for the route, then only the Locked indicators and the corresponding StÜM light up yellow.
Manually Locked Indicator [D]
When the switch is manually locked with the Lock Switch Button, the manually locked indicator is lit red. The current switch position will be shown as well.
The Switch Button
The switch can be operated with the switch button (WT) [E]. Pressed alone, it displays the current position of the switch by the momentary illumination of the corresponding StÜM (position indicator [A]). When pressed together with one of the various Switch Group buttons it is used to
- Throw the switch manually;
- To manually lock the switch;
- To unlock a manully locked switch;
- To reset a trailed switch;
- To revoke the locking of a switch when it is part of a route. The group button to be used depends on if the route state is a train route (FHT) or a shuntroute (FRT);
- To reset an axle counter circuit of the switch (if availble; the WT button is in this case braun with a white dot).
Examples
-
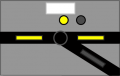 Switch locked in route
 -
 Switch locked in route and occupied
 -
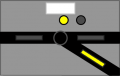 Switch locked as flank protection
 -
 Switch manually locked
 -
 Switch with axle-counting circuits


Crossings
An Kreuzungen kreuzen sich zwei Gleise, allerdings ist kein Übergang zwischen ihnen möglich. Einfache Bauformen kommen ohne bewegliche Teile aus. Bei besonders spitzwinkligen Kreuzungen gibt es jedoch oft bewegliche Herzstückspitzen, da sonst die Strecke, in der das Rad des Zuges ohne Führung ist, zu groß wäre. Doch auch Kreuzungen ohne bewegliche Herzstückspitzen müssen im stellwerkstechnischen Sinn "gestellt" werden, da es zwei mögliche Fahrwege gibt, die gegeneinander ausgeschlossen werden müssen. Eine Kreuzung wird daher wie eine Weiche bedient und besitzt ebenfalls eine Weichentaste, vier StÜM, einen Verschlussmelder und einen Sperrmelder.
-
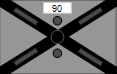 Crossing

Slip Switches
Kreuzungsweichen stellen eine Mischform aus Kreuzung und Weiche dar: Sie ermöglichen sowohl das Kreuzen eines Gleises als auch den Gleiswechsel. Im Gleisbild stellen sie sich als Kreuzungen dar, die mit einer (einfache Kreuzungsweiche) oder zwei (doppelte Kreuzungsweiche) zusätzlichen Linien gekennzeichnet sind. Diese Linien zeigen an, welche Gleiswechsel an der Weiche möglich sind (im Beispiel bei der einfachen Kreuzungsweiche: von links oben nach rechts unten und oben und umgekehrt, aber nicht von links unten nach rechts unten). Man unterscheidet den a/b-Zweig und den c/d-Zweig.
-
 Single Slip Switch
 -
 Double Slip Switch
 -
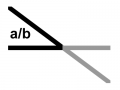 a/b-branch
 -
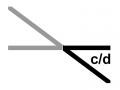 c/d-branch


Im Prinzip sind die beiden Zweige nur zwei einfache Weichen, die eine gemeinsame Weichenspitze haben. Beide Weichen lassen sich unabhängig voneinander bedienen (stellen, sperren usw.), daher gibt es für jeden Zweig einen eigenen Verschlussmelder und Sperrmelder. Es gibt allerdings nur eine WT. Daher muss man vor jeder Bedienung mit der Kreuzungsweichentaste sicherstellen, dass der richtige Zweig für die Bedienung vorgewählt ist.
Derailer
Derailers are mainly found where the main tracks connect to secondary tracks (for example: shunting areas or sidings). They serve as a flank protection, in case there is no 'normal' switch present that can provide the required flank protection and to derail a train which is accidentally driving into it. Derailers are normally in their diverted position. When a route has been set over it, they need to be set back to their groun position manually afterwards. They have a switch button, a Locked indicator and a Manually locked indicator.
-
 Derailer
